
This language lesson is designed for 6 to 12-year-old children to guide them on how to write English alphabets in cursive. When children start forming letters, it creates a connection between the movement of the hand and visual response.
The simultaneous process of thinking of letter formation, movement of hand and visual cue fosters reading and writing concomitantly. Additionally, it also helps to strengthen finger muscles and promotes fine motor skills. According to Dr. Wlliam R.Klemm in Psychology Today – the brain imaging reveals that multiple areas of the brain become co-activated during the learning of cursive writing of pseudo-letters, as opposed to typing or just visual practice.
Tips to Write Cursive
Cursive writing is a continuous form of writing. We do not lift the pencil once we begin writing a cursive letter or word. The pencil is lifted only once the letter or the word ends.
When a child starts to learn cursive writing, they need to master the lowercase cursive letters first. The letters are not taught in sequence but the easy formed letters are taught earlier to get the perfection in strokes. Hence, usually cursive writing is divided into family.
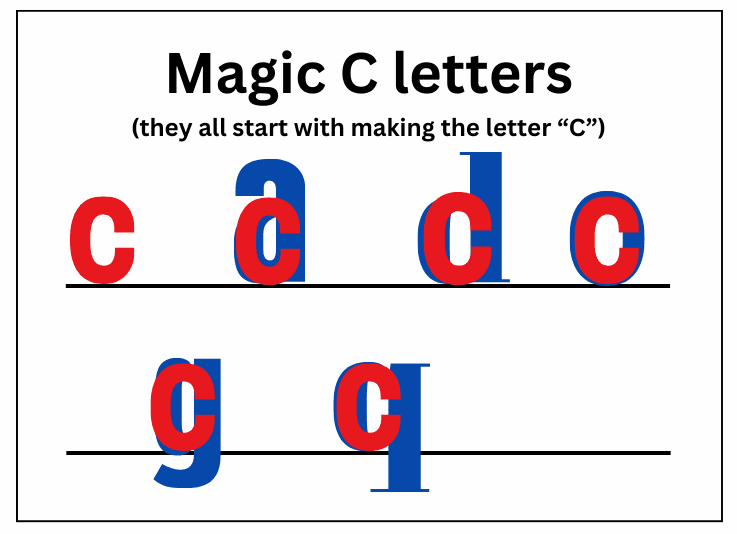
Here are the families of cursive letters –
- C family that has letters c, a, d, o, g, and q
- Loop family that includes letters b, h, f, k, l, and e.
- Up and down stroke family which has the letters j, p, r, w, u, s, t, and i.
- Hump family has 4 letters n, m, v, and y.
- Bump Family includes 2 letters x and z.
When the above pattern is followed, the cursive writing becomes easier for the children. The strokes and pattern should be followed the right way to attain good handwriting.
How to write a-z letters in cursive?
We have divided this lesson based on families as discusses above. Let us begin with the c family. The letters included in this family have easy strokes and the child can easily grasp them.
How to write letters in C Family?
Letters c, a, o are middle zone letters that means they lie between the headline line and the baseline. Whereas, the letter d is upper zone letter that means the letter starts from the baseline and goes to the top line through the head line. The letters g and q are lower zone letters that lie between the head line and the bottom line.
How to write letter c in cursive?
The first stroke begins with an under curve in the direction of the headline. The slope now curves downward from the left to the base line. To connect other cursive letters, leave the stroke with a loop or connector pointing towards the right.
How to write letter a in cursive?
The stroke should begin at the baseline. From the baseline to the head line, create an under curve. Descends the stroke, taking a downward curve to the base line and a slant toward the headline. Drops as a down curve to the base line. To connect other cursive letters, leave the stroke with a loop to the right side of the letter.
How to write letter o in cursive?
Start with the base. Draw an under curve that leads to the upper line. descends in a half circle to the left until it reaches the baseline. Now make another half circle to the right and move to the top line. The stroke is rotated to the left to create a tiny loop, and it is left with a connector pointing in the direction of the right to connect other cursive letters.
How to write letter d in cursive?
Start at the baseline first. From the baseline to the head line, create an undercurve. Descends the stroke slanting to the top line and curving downward to the base line. Falls as a lengthy down curve to the base line. To complete the letter or join other cursive letters, leave the stroke with a connector.
How to write letter g in cursive?
Start with the base. Draw an under curve that leads to the upper line. Return now, descending until you reach the base line. Proceed once more to the head line. Descends to the bottom line and then slants back to the baseline by completing a loop around the left. Take slightly above the baseline. To finish the letter or join other cursive letters, leave the stroke with a connector pointing towards the right side after it meets the baseline.
How to write letter q in cursive?
Start with the base. Draw an undercurve in the direction of the head line. Return now, descending until you reach the base line. Proceed once more to the upper line. descends slantingly to the bottom line and then curves at an angle to the right to rise once more to the base line. Take it a little above the baseline. To complete the letter or join other cursive letters, leave the stroke with a connector.
Help the child write these letters again and again to get firm with basic cursive strokes. The next family to write is the up and down stroke family. We follow the sequence as i, u, w, t, r, s, j, p
Up and Down Stroke Family
Letters i, u, w, r, s are middle zone letters that means they lie between the headline line and the baseline. Whereas, the letter t is upper zone letter that means the letter starts from the baseline and goes to the top line through the head line. The letters j and p are lower zone letters, that is they lie between the head line and the bottom line.
To write cursive i
Start with the base. Draw an undercurve in the direction of the head line. descend with a down curve until you reach the base line. Proceed once more to the upper line. descends slantingly to the bottom line and then curves at an angle to the right to rise once more to the base line. To finish the letter, a dot is positioned just above the headline.
To write cursive u
Start with the base. Use an undercurve to take the stroke to the headline. descends using a downward curve that mirrors the preceding curve to reach the baseline. To finish the letter, a dot is positioned just above the headline. To finish the letter or join other cursive letters, leave the stroke with the connector on the right side.
To write cursive w
The first stroke begins at the baseline and ends at the midline, curved slightly. Now, while maintaining a small curve, return to the baseline and repeat the process to the midline. Proceed towards the baseline once more, bending slightly, forming a semicircle, and reaching the midline. Simply draw a small curve at the midline to complete the letter w in cursive.
To write cursive t
Stare at the baseline first. Draw an undercurve in the direction of the head line. Using a downward curve that mirrors the preceding curve, bring the stroke to the baseline. Stretch to the right and use the leaves as a connector to connect other cursive characters. Just above the headline, draw a sleeping line that runs from left to right.
To write cursive r
The first stroke begins at the baseline and moves to the midline in an undercurve. Now, create a tiny loop to the left and then reach to the middle line. From this point on, create a small curve that meets the baseline. At the ending, continue the curve in the midline between the baseline and the midline, ending the letter r at the connector.
To write cursive s
Stare at the baseline first. Draw an undercurve in the direction of the head line. Bring the stroke down slightly so that it falls straight and forms a right down curve that ends at the base line. This should be met with the initial stroke. To close the letter or join other cursive letters, leave the last stroke with a connector on the right side.
To write cursive j
Start at the baseline first. Draw an undercurve in the direction of the head line. Bring the stroke down slightly so that it falls straight to the bottom line and turns as a loop on the left side. Take the stroke in a slant manner to the base line. To close the letter or join other cursive letters, leave the last stroke with a connector on the right side.
To write cursive p
Start at the baseline first. Create an undercurve in the direction of the head line. The stroke descends slantingly to the bottom line, but it does not touch it. It then rises to the headline at the same slant. At the head line, it turns into an overcurve and descends as a back down curve all the way to the base line. The last stroke has a connector on the right side to finish the letter or join other cursive letters; it does not join the preceding slant.
The next family to teach is the loop family that includes letters b, h, f, k, l, and e.
Loop Family
The correct sequence to teach the letters is e, l, b, f, h, and k. The letter e is the middle zone letter that means it lies between the headline and the baseline, whereas the letters b, l, k, h are the upper zone letters that means the letter starts from the baseline and goes to the top line through the headline. Letter f is a full zone letter that lies between topline and bottom line.
To write cursive e
Start the letter from the baseline and take the stroke to headline with an under curve. Turn a loop to the left side and bring it back to the base line with a down curve. Extends a little to the right and leaves as a connector to join other letters.
To write cursive l
Start the letter from the baseline and take the stroke to the topline with an under curve. Turn a loop to the left side and bring it back to the base line with a down curve. Extends a little to the right and leaves as a connector to join other letters.
To write cursive b
Start the letter from the baseline and take the stroke to the top line with an under curve. Turn a loop to the left side and bring it back to the base line with a down curve. Take the stroke with a short under curve on the right till the head line. Tail out a loop towards the right side to end the letter.
To write cursive h
Begin the stroke from the baseline. Make an under curve from the baseline to the top line and turn the stroke into a loop on the left side. Stretch it to the baseline as a slant line. Make an over curve to the headline. Comes down to the baseline as an under curve stroke. Leave the stroke with a connector to join other cursive letters.
To write cursive f
It starts with an undercurve from the baseline to the topline. Make a slight curve to the left and mark a slant stroke from topline to the bottom line. Make a slight curve to the right and go up to the baseline. Form a small loop there and leave the stroke with a connector to join other cursive letters.
To write cursive k
It starts with an undercurve from the baseline to the topline. Make a slight loop to the left and mark a slant stroke from topline to the base line. Then goes up as an over curve to the headline and comes down with a connecting curve to touch the slant line. Convert the stroke to left undercurve till the baseline. Leave the stroke with a connector to join other cursive letters.
The Hump family has 4 letters – n, m, v, and y and is the next family to be taught while writing cursive letters.
Hump Family
Middle zone letters n, m and v are part of the hump family, meaning they lie between the headline and the baseline. The letter y is the lower zone letter that means the letter lies between the headline and the bottom line.
To write cursive n
Start at the baseline first. Curve over in the direction of the head line. descends to the baseline as a slanted line at this point. Proceed once more to the head line, with an over curve. Return in a slanting line to the baseline. To finish the letter or join other cursive letters, leave the stroke with a connector pointing towards the right side after it has met the baseline.
To write cursive m
Start with the baseline. Proceed with the stroke to the head line in an over curved shape. To reach the baseline, make a slanting stroke. ascends as an over curve to the head line once more before descending slantingly to the base line. As in the preceding stroke, ascends to the upper line and descends once more to the base line. To conclude the letter, leave the stroke with a connector.
To write cursive v
Begin with the baseline. Make an under curve towards the head line. Bring the stroke to the baseline with a down curve and go back to the headline with an under curve. Form a loop on to the left and join the headline. Leaves as a connector to join other cursive letters.
To write cursive y
Start at the baseline first. Draw an undercurve in the direction of the head line. With a downward curve, move the stroke to the baseline, then return with an undercurve to the headline. Return the stroke to the bottom line, then create a loop that faces left. Proceed with a slant stroke till the baseline. To finish the letter or join other cursive letters, leave the stroke slightly above the base line and add a connector on the right side.
The last family to write cursive small letters is the bump family. Bump Family includes 2 letters x and z.
Bump Family
Letter x is a middle zone letter, meaning it lies between the headline and the baseline. Whereas the letter z is the lower zone letter that means the letter lies between the headline and the bottom line.
To write cursive x
The stroke should begin at the baseline. From the baseline to the head line, create an slant curve. Descend the stroke, taking an outer curve to the base line and take the stroke back on the same curve till mid and form an slant curve to the headline. Drops as a down curve to the base line. To connect other cursive letters, leave the stroke with a loop to the right side of the letter.
To write cursive z
The stroke should begin at the baseline. From the baseline to the head line, create an slant curve. Descend the stroke, taking an outer curve to the base line and repeat the same curve to the bottom line. Make a small loop towards the left and extend a slant line a little above the baseline.
Writing in cursive is an excellent and constructive writing technique. It is swift, adaptable, and sophisticated. This writing style is one of the most striking if the letters are formed correctly and joined together. The first step in learning cursive writing is to simply write the basic alphabet in cursive. To keep things simple and easy, let the child practice cursive writing with a pencil on regular paper.